Friday, 17 March 2017

Secret Game in Android


Secret Game

Another well-known Android Easter egg among old-timers, the secret game might not be so obvious to newcomers.
Lollipop and Marshmallow’s game is based on Flappy Bird; it has the same gameplay principle but has had an Android-themed makeover graphics-wise.
Head to Settings > About phone and tap the device’s version number several times. Eventually you’ll be presented with an on-screen lollipop or marshmallow depending on your operating system. Continue to rapidly tap the center of it and the game will launch.

Manage App Notifications


Manage App Notifications

Moving on one step further from the previous tip, after you’ve long-pressed the app you’ll see an information icon. Press it, and you’ll be presented with the notification settings for the app in question.

You can do things like block all its notifications, allow it to override priority mode, and make it hide private information.

Manage App Notifications for Android Mobile

Moving on one step further from the previous tip, after you’ve long-pressed the app you’ll see an information icon. Press it, and you’ll be presented with the notification settings for the app in question.


You can do things like block all its notifications, allow it to override priority mode, and make it hide private information.

Quickly Change Your WiFi Network

Oddly, how to quickly switch between WiFi networks is not very obvious. Sure, you can go to Settings > Wi-Fi and change it there, but there has to be a faster way, right?


Swipe down twice from the top of your screen to open the Quick Settings menu, and instead of pressing on the WiFi icon (which disables it), instead press on the network’s name. You’ll immediately be given a list of all the networks in your vicinity.
That is, if your version of Android supports this.

Enable Developer Mode


1) Enable Developer Mode

Ok, this is one of the more widely known tricks, but it’s important nonetheless, so we are going to include it.
       
Navigate to Settings > About phone and tap on your phone’s build number seven times. You’ll get an onscreen countdown, eventually followed by a message saying “Congratulations, you are now a developer”.

2) Change the Animation Scales

For the most part, the latest Android phones already feel very snappy. However, after the latest Nexus 5X only shipped with 2GB of RAM, some users were left feeling a bit underwhelmed by Google’s hugely popular product line.
There are also lots of popular entry-level phones that come with slower processors and only 1GB or 2GB of RAM.

One solution is to change your phone’s “Window animation scale”, “Transition animation scale” and “Animator duration scale” from 1x to 0.5x. Granted, it won’t actually make your phone faster, but it will make it feel faster.
Go to Settings > Developer options and scroll about two thirds of the way down the list to find the necessary options (you’ll need to have first enabled Developer Mode).

3) Clear App Defaults

It’s annoying when a link opens in a certain app rather than in the browser. It could be a YouTube link, a tweet, or a Facebook page — you’ll end up waiting around while your phone shuts down Chrome (or your browser of choice) and fires up something else.
It’s easily fixed.
Go to Settings > Apps and find the app that keeps opening. Once there, scroll down to Open by default, press it, and then select Clear Defaults.
If that doesn’t work, try doing the same with your browser app as well.


Enable Developer Mode in Android Mobile


1) Enable Developer Mode in android mobile

Ok, this is one of the more widely known tricks, but it’s important nonetheless, so we are going to include it.
       
Navigate to Settings > About phone and tap on your phone’s build number seven times. You’ll get an onscreen countdown, eventually followed by a message saying “Congratulations, you are now a developer”.

2) Change the Animation Scales

For the most part, the latest Android phones already feel very snappy. However, after the latest Nexus 5X only shipped with 2GB of RAM, some users were left feeling a bit underwhelmed by Google’s hugely popular product line.
There are also lots of popular entry-level phones that come with slower processors and only 1GB or 2GB of RAM.

One solution is to change your phone’s “Window animation scale”, “Transition animation scale” and “Animator duration scale” from 1x to 0.5x. Granted, it won’t actually make your phone faster, but it will make it feel faster.
Go to Settings > Developer options and scroll about two thirds of the way down the list to find the necessary options (you’ll need to have first enabled Developer Mode).

3) Clear App Defaults

It’s annoying when a link opens in a certain app rather than in the browser. It could be a YouTube link, a tweet, or a Facebook page — you’ll end up waiting around while your phone shuts down Chrome (or your browser of choice) and fires up something else.
It’s easily fixed.
Go to Settings > Apps and find the app that keeps opening. Once there, scroll down to Open by default, press it, and then select Clear Defaults.
If that doesn’t work, try doing the same with your browser app as well.


How to Enable Flash in Chrome for Specific Websites


If you’re a Chrome user, which you should be, you probably have noticed that Flash is blocked by default in the browser. Google does not like Flash because of the major security flaws inherent in Flash and therefore does everything in its power to force you not to use Flash.
The only problem is there are still a lot of sites that use Flash. None of the major sites you visit every day like Facebook, Instagram, etc. use it, but a lot of smaller and older sites just haven’t bothered to switch to HTML 5. For example, I am taking a Cisco course at my local community college and in order to complete the assignments, I have to log into Cisco’s NetAcademy website. The problem is that some of the questions require Flash to view and answer
If you do a quick Google search for enabling Flash in Chrome, you’ll see a lot of articles telling you to download Flash from Adobe’s website and install it (which won’t work) or to open a Chrome tab and go to chrome://plugins (which also won’t work anymore). In the most recent version of Chrome (57), you can no longer manage plugins by going to that URL. Instead, you’ll just get a “This site can’t be reached” message.

This is terribly unintuitive and really confused me because I was used to going there to enable or disable Flash as needed. Now it seems they only want you to enable it for the specific sites where it is needed. In this article, I’ll explain how to get Flash to work when you need it and how to keep it disabled otherwise.

Check Chrome Flash Settings

First, let’s check the Flash settings in Chrome. There are a couple of places where you can do this. Open a new tab and type inchrome://flags.
Make sure that Prefer HTML over Flash and Run all Flash content when Flash setting is set to “allow” are set to Default. Open another tab and type in chrome://components. Under Adobe Flash Player, click the Check for update button.
Now click on the Chrome menu button at the top right and click on Settings.
Scroll down to the bottom of the page and click on Show Advanced Settings. Scroll down some more and then click onContent Settings under Privacy.
In the popup dialog, scroll down until you see the Flash heading. Make sure that the Ask first before allowing sites to run Flash (recommended) box is selected. Obviously, if you want to completely block Flash in Chrome, select Block sites from running Flash. You should never choose Allow sites to run Flash unless you have a really valid reason like using Chrome in a virtual machine or something.

Allowing Sites to Run Flash

Now for the fun part! In order to run Flash, you have to enable it for specific sites only. There is no longer an option to enable it for everything all the time. One way to specify a site for Flash is to click on the Manage exceptions button under Content Settings – Flash as shown in the screenshot above.
As you can see, I have added the NetAcad site I was talking about earlier with Behavior set to Allow. This method is a bit cumbersome since you must go to the Settings page, etc. The easier way to allow a site to run Flash is to go to the site and then click on the little icon to the left of the URL in the address bar.
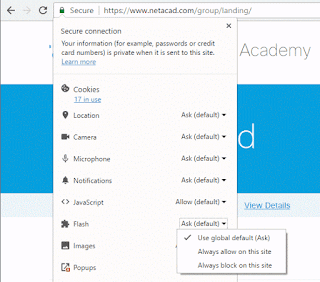
The icon will either be a lock icon if the connection is using HTTPS or it’ll be an information icon if the connection is non-secure. When you click on this icon, you’ll see a bunch of settings you can configure for that particular site. Towards the bottom will be Flash. By default, it should be set to Use global default (Ask), which means the browser should ask you if you want to enable Flash for a site that has Flash content.
However, in my experience, the browser never actually asks me to enable Flash content even when there is clearly Flash content on the website. So, I have to basically select the Always allow on this site option in order for Flash to work. Note that you may have to close the tab and reload it in order for the Flash content to appear correctly.
That’s about it. Hopefully, this clarifies exactly how Flash works in the latest version of Chrome. I’m sure it’s going to change again soon, so I’ll be sure to update this post in case that happens. If you have any questions, post a comment. Enjoy!